|
|
|
After you have finished installing Client Track on your computer, follow the instructions below to
set up Client Track and begin the 30-day free trial period. |
|
|
 |
|
Client Track Setup |
|
|
|
|
Step 1 |
|
|
|
Double-click the Client Track 6 setup (.exe) icon on your desktop. |
|
|
|
Step 2 |
|
|
|
30-Day Free Trial |
|
|
|
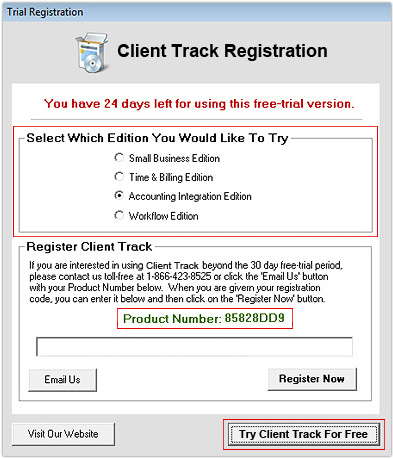
A) Select which edition you would like to try during the 30-day free trial period. The free trial
is a full working version with all of the features of Client Track 6.
2) Click Try Client Track For Free and go to Step 3 section. |
|
|
|
 |
|
|
|
Register Client Track 6 |
|
|
|
1) When you are ready to purchase Client Track 6, mark down on paper your Product Number
as seen above
which you will need for the payment type of your choice here. You can also
go through the payment form without a Product Number and then click Email Us in the
registration window to request a registration code afterwards. |
|
|
|
2) Copy your registration code within a confirmation purchase email sent from us. |
|
|
|
3) In Client Tracks main menu, go to Support > Registration Information. |
|
|
|
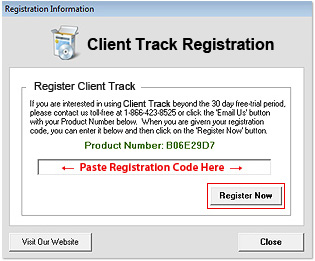
4) Paste your registration code inside text field shown below and click
Register Now to
unlock the 30-day free trial mode. |
|
|
|
 |
|
|
|
Step 3 |
|
|
|
 |
|
|
|
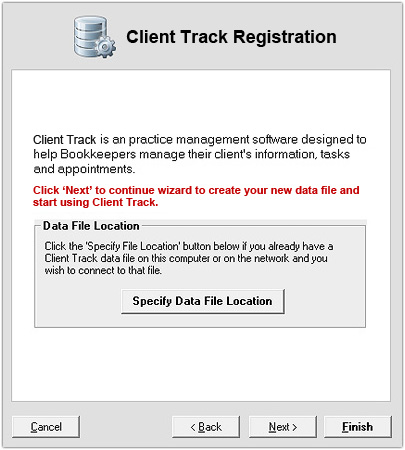
Client Track automatically creates a data file for you, therefore, click Next. |
|
|
|
Note: If there is en existing data file, click
Specify File Location and link Client Track to that
data file. For more information on data file, go here. |
|
|
|
Step 4 |
|
|
|
 |
|
|
|
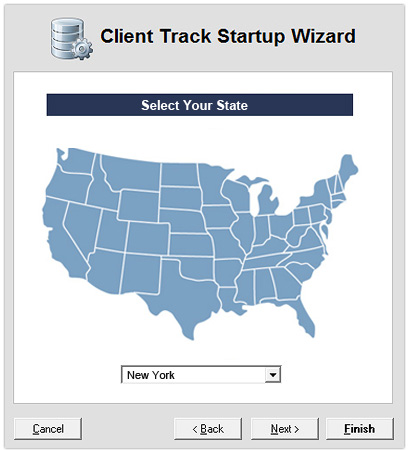
1) Select your state from drop-down list.
2) Click Next. |
|
|
|
Step 5 |
|
|
|
 |
|
|
|
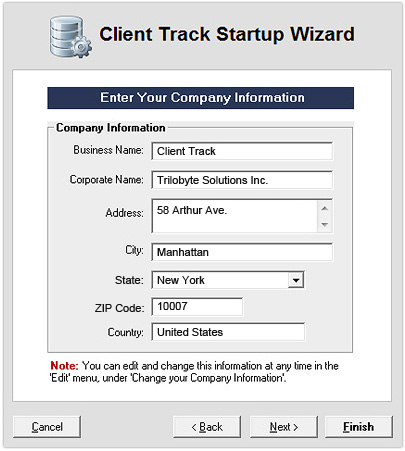
1) Insert all of your company's information in all of the fields.
2) Click Next. |
|
|
|
Step 6 |
|
|
|
 |
|
|
|
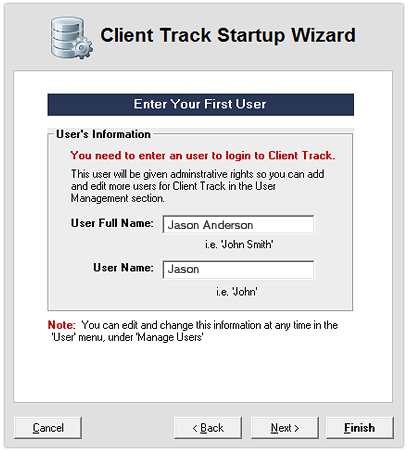
1) Type in full and user names.
2) Click Next. |
|
|
|
Note: The user name appears in the
login screen when you start up Client Track. |
|
|
|
Step 7 |
|
|
|
 |
|
|
|
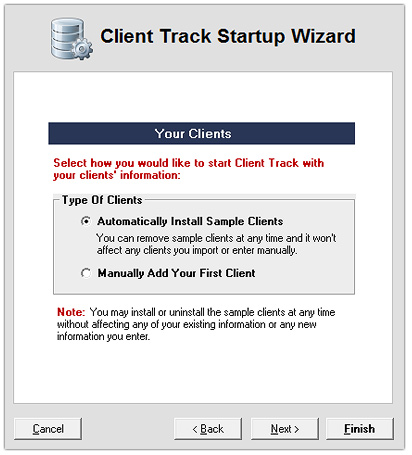
1) Select Automatically Install Sample Clients.
2) Click Finish to begin using Client Track. |
|
|
|
Step 8 |
|
|
|
After you purchase Client Track, you can import your clients by following these two steps: |
|
|
|
|
